Throwing Exceptions: Clay 3D Printing
The Intersection of Computer Science and Pottery
I have recently been interested in finding projects that link pottery and computer science together. My mother is a visual artist who has spent a large portion of her life working with clay, and I have spent a large part of my life playing with and working on computers, currently working as a software developer.
I feel that we both exsert a lot of creativity in our respective fields, but it is quite hard to bridge the two in a common language.
Mum recently started working with clay 3D printers as part of personal career growth in her capacity as a lab technician at AUT, and had the opportunity to lend my flatmate and I a Cerambot 3D printer for a few weeks to play around with. This blog post outlines the process of using the 3D printer to turn a design in Blender into a piece of pottery, and all the little issues along the way. But it also signifies the start of an interest in finding ways to combine the field of ceramics with computer science (tentative name for the project “Throwing Exceptions”).
All of the technical work with the 3D printer was done in collaboration with my friend Kieran, and all the glazing and firing was done in collaboration with my mother, in her pottery studio. A lot of inspiration and guidance was taken from Jonathan Keep’s blog.
Overview
I’ll give an overview of the making process from design in blender to firing the finished product in a kiln, and then I’ll give a summary of all the interesting hiccups, happy accidents, and learnings we had along the way.
Note that Kieran has done an awesome write up on the specific setup for our Cerambot printer. However I will provide a general overview here for broader context and brevity.
Process
Design and rendering
- Design in Blender
- We used the awesome open-source 3D design tool Blender to make our designs
- Finished designs were exported as
.stlfiles.
- Render in Cura
- Import the
.stlfiles into the open source 3D printing software UltiMaker Cura - This program allows you to render your design to
.gcodethat will instruct the printer how to print the design - You’ll need to get a good configuration for your printer setup - ours are defined here
- Import the
- We then put the
.gcodefiles onto a MicroSD and take it to the printer
A note on design limitations
- Can’t have any over-hanging parts or the clay will slump
- The larger designs can get quite unstable as the clay is very soft, so making sure the design is well stacked vertically is a must
Printer setup
- Clay preparation
- We used Mac’s Mud: Classic White as a starting point
- We mixed in water till the clay had a consistency of mud, allowing for better extrusion
- Filling the ram extruder
- Getting the clay into the ram extruder without any air bubbles was a tricky task to get right, but we devised a repeatable method
- The goal is to minimise air pockets, to avoid popping at the final extrusion
- Method:
- Compactly fill a tall container with the slushy clay
- Push the ram extruder upside down into the clay, filling it up to the small outlet
- This prevents most air bubbles and take the least amount of time
- Platform for the work to be printed on
- We used bits of cardboard to print on, with a thin layer of clay on the top
- This was in the hope that as the work dried and shrunk, the cardboard and clay layer would provide slack, preventing the work from cracking
- This remained an issue, causing quite a few failures
- Make sure the printer is aligned with the ground plate
- This is outlined in Kieran’s write-up - it’s a bit finicky, and can involve adding a custom gcode prefix to the generated code.
- Monitor printing
- Turn on the printer, select the design and start printing!
- Stand by incase of a failure, to reset and start again avoiding wasted time and clays
- Removing works
- Very carefully remove the work from the printer
- Put it somewhere with relatively stagnant airflow
- this allows it to dry slowly and evenly, reducing non-uniform shrinkage related cracks
- Cleaning up the printer
- Once you’ve finished your printing session make sure to wash clay off all components
- Letting clay dry on important mechanical components can be a pain to clean up later
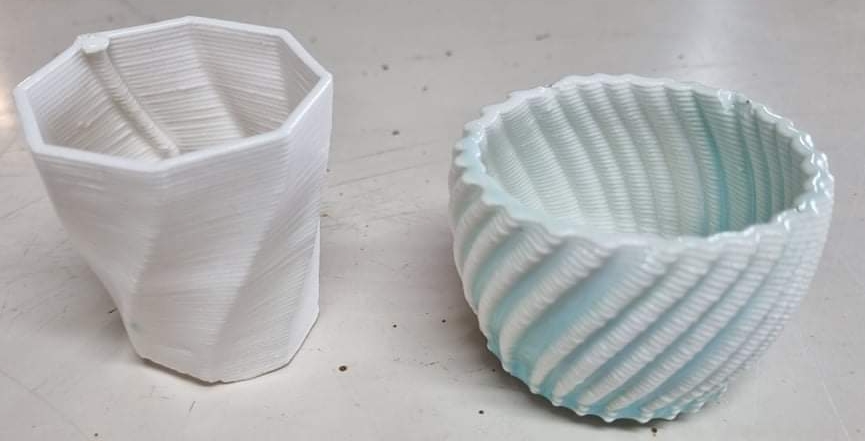
 drying_collection_successes
 printing_pimple_dim_lighting
 printing_white_noise
 printing_white_noise_finished
 printing_white_noise_finished_3


Pottery
Once you have a collection of printed works, it’s time for them to go through the firing process in a kiln.
- Bisque firing
- A bisque firing is the first of two firings
- It generally gets up to 900°C-980°C
- The purpose of the bisque is to harden the work, and to prepare it for glazing
- Some important things that occur in the bisque firing:
- Water evaporates from the clay (>100°C), drying it out completely
- Sintering occurs (800°C-900°C)
- Clay particles fuze together, meaning the bisqued work will no longer break down in water
- Depending on the size/thickness of your pieces, you should slow down the temperature raise to avoid thermal shock
- All our pieces were quite small and thin, meaning we could quickly raise to ~900°C at about 150°C an hour

- Glaze
- Once bisqued, your piece is ready for glazing
- Glaze is the shiny glassy exterior on ceramics, it make the works waterproof and more durable
- Glazes are generally a suspension of silica, flux, aluminum oxide, and colourants.
- Take the bisqued works and dip them in a bucket of stirred glaze for about a second, and then leave them to dry
- The completely dry work will pull in the liquid from the glaze, leaving a film of particulate (from the suspension) evenly across the exterior of the work.
- This film of particulate will be melted into glass in the next firing
 glazing_with_kieran
 pre_firing_glazed_collection_2
 pre_firing_glazed_collection_3
 pre_firing_glazed_collectoin


- Final firing
- The final firing goes to around 1200°C, and melts the glaze, fuzing it to the bisqued clay
- The heating and cooling rates are more important to consider here, as the glaze and the clay body will heat at different rates and will potentially have different heat expansion ratios.
- You will need to find an appropriate profile for your clay and glaze
 glazed_blue_cylinder
 glazed_buldgey_two_pieces
 glazed_collection_red_yellow
 glazed_finished_collection
 kiln_load


After the final firing, you have finished pieces ready for use!
Happy Accidents, Learnings, and Experiments
Air bubbles
If the ram extruder isn’t packed well, there will be little pops of air that come out the extruder, this results in little explosions on the side. Our packing method mitigated most of this, however it still happened on occasion


Z-Seam
In Cura there are settings for “Z Seam Alignment”, this determines where the extruder starts and ends each layer - which can end up resulting in a seam in the work going up the Z direction.
The different options for Z Seam Alignment are:
- Sharpest Corner
- This worked ok if there were well defined corners on the work
- Random
- This resulted in a bunch of cross hanging extrusions, which looked cool but made the piece unusable
- Shortest
- I Believe this was the best option, with other settings forcing the seam to be hidden
 drying_aligned_seam
 drying_octo_cup
 drying_octo_cup_dynamic_seam
 drying_test_cup_fixed_seam
 drying_test_cup_no_seam
 drying_test_cup_no_seam_2


Collapsing
With structurally unstable designs, we had a lot of them topple over just after finishing printing, we learnt that leaving it to dry for a while in the printer was good for bigger works, despite slowing down production significantly.


Over-extrusion
When the extrusion rate was set too high the output clay would be deformed outward, resulting in some thick walls


Incorrect layer heights
If the layer height was too big the extruder would get too far from the work and the extruded clay would splay in and out sideways. I quite liked these ones.


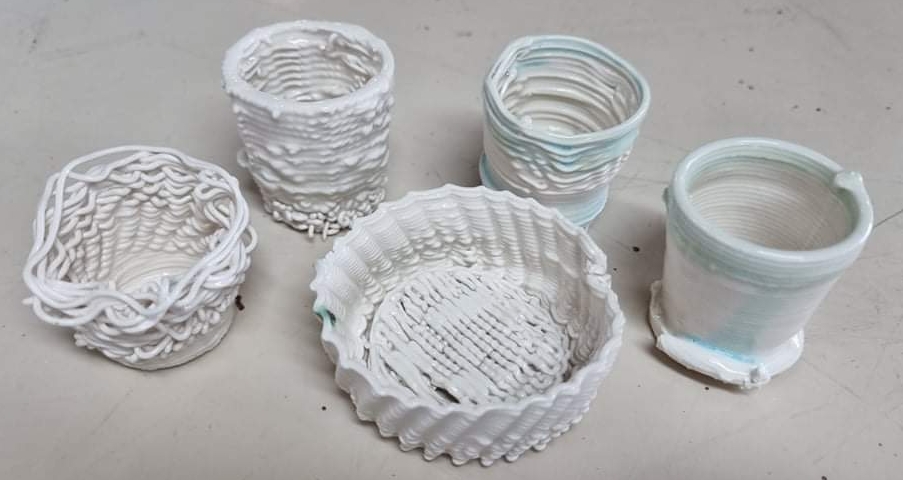
Skipping the bottom layers
After seeing the wobbles from the large layer heights we decided to skip the first few layers, in order to see what wobbly structures we could make. We ended up with some beautiful spaghetti bowls


Thin Bottoms
Getting the bottom of the works to say intact was tricky, the would often peel off, disconnect, or crack off the bottom plate. We ended up mitigating this by making the bottom layers slightly over-extruded and a few layers thicker.


Cold Starts
We found that you can’t just start up a print, you should get it extruding a bunch of clay (by starting a print and stopping it part way through the beginning) first, then quickly restart with the build plate below. Cold starts result in weak bases of the work.


Speed Wobbles
If the extrusion was coming out too fast, or if the work wasn’t directly bellow the extruder (i.e. because of an air bubble crater) the extrusion would output side to side, creating a blemish on the side of the work
 drying_test_cup_speed_wobbles
 drying_test_cup_speed_wobbles_2
 drying_test_cup_speed_wobbles_3
 drying_twisted_triangle_blemish


Over Glazing
When glazing the bisqued works, if they are dipped too long (or re-dipped) there can be too much glaze, which causes dripping and the work adhering to the kiln shelf or the stands it was on during the firing

Mini Faces
We opened up the floor for friends and family to make some works, my partner flexed her blender skills and made some plant pots with faces on them


Successful Pieces
 drying_octo_cup_2
 glazed_clear_octo_spiral_cup
 glazed_successful_clear_two_pieces
 printing_white_noise_finished_2


Next steps
- Streamline the process
- Experiment with glazes
- Try and get the outputs water tight
All Images
 bisqued_collection_failures
 drying_aligned_seam
 drying_collection_successes
 drying_curly_cup_failure
 drying_curly_cup_failure_2
 drying_faces_two_pieces
 drying_faces_two_pieces_2
 drying_failure_collection
 drying_octo_cup
 drying_octo_cup_2
 drying_octo_cup_dynamic_seam
 drying_peeling_bottom_failure
 drying_test_cup_air_bubble
 drying_test_cup_cold_start
 drying_test_cup_cold_start_top
 drying_test_cup_fixed_seam
 drying_test_cup_no_seam
 drying_test_cup_no_seam_2
 drying_test_cup_speed_wobbles
 drying_test_cup_speed_wobbles_2
 drying_test_cup_speed_wobbles_3
 drying_test_cup_thin_bottom
 drying_twisted_triangle_blemish
 drying_twisted_triangle_nice
 glazed_blue_cylinder
 glazed_blue_test_cup
 glazed_buldgey_two_pieces
 glazed_clear_octo_spiral_cup
 glazed_clear_test_cup
 glazed_collapsed_two_pieces
 glazed_collection_red_yellow
 glazed_curley_failure
 glazed_curley_failure_2
 glazed_drippy_two_pieces
 glazed_failed_bottom_two_pieces
 glazed_failure_collection_clear
 glazed_finished_collection
 glazed_red
 glazed_scaffolded_green
 glazed_successful_clear_two_pieces
 glazed_thick_two_pieces
 glazing_with_kieran
 kiln_load
 pre_firing_glazed_collection_2
 pre_firing_glazed_collection_3
 pre_firing_glazed_collectoin
 printing_pimple_dim_lighting
 printing_white_noise
 printing_white_noise_finished
 printing_white_noise_finished_2
 printing_white_noise_finished_3
 printing_white_noise_popped_side


